Use your own domain name
 Free Trial accounts cannot change the domain name
Custom Domain Setup for Your Tracking Platform
Step 1. Create your domain name
Example:
mydomain.com, then typical subdomains for the tracking platform could be:app.mydomain.comtracking.mydomain.com
- platform.mydomain.com
- portal.mydomain.com
- dashboard.mydomain.com
- track.mydomain.com
- tracker.mydomain.com
- login.mydomain.com
- fleet.mydomain.com
- iot.mydomain.com
- assets.mydomain.com
- devices.mydomain.com
- vehicles.mydomain.com
- gps.mydomain.com
- mytracker.mydomain.com
- go.mydomain.com
- locate.mydomain.com
Step 2: Create a CNAME Record
Log in to your domain registrar (e.g. GoDaddy, 123-reg, Namecheap).
Navigate to the DNS Settings (sometimes called Advanced DNS, Manage DNS, Records, etc).
Add a CNAME Record with the following details:
Field | Value | ||
Name / Host | login (or your chosen subdomain) | ||
Type | CNAME | ||
Value / Points to |
|
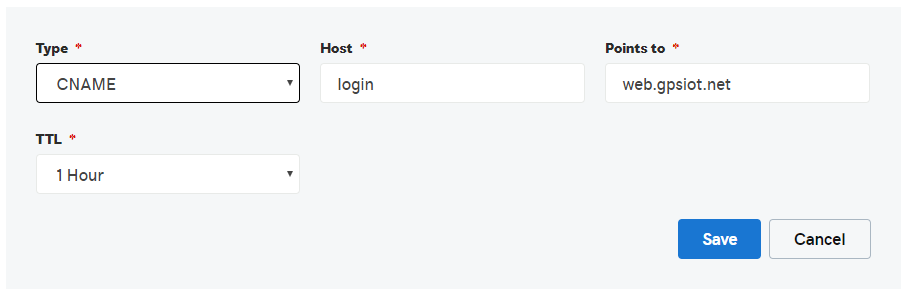
Example:
login.mydomain.com, the CNAME record should look like:Host:
loginType:
CNAMEValue:
web.gpsiot.net
Here is an example using GO DADDY website:
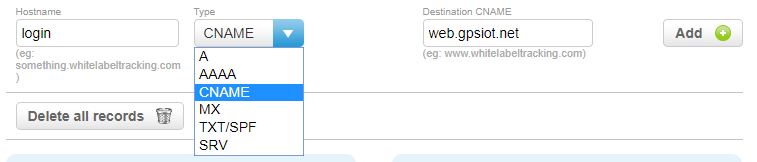
Here is an example using 123-REG control panel:
Step 3. Tell us your domain name so we can create your HTTPS SSL certificate
Once your domain is correctly pointing to web.gpsiot.net You will get an email for further directions once you sign up to a full account
Step 4: Update Your Platform Settings
Step 4: Update Your Platform Settings
If this is your first custom domain, we will configure it for you and let you know when it's live.
If you're setting up an additional domain for a Sub-Reseller, follow these steps:
-
Log in using your original platform URL.
-
Go to:
Admin > Sub Reseller > Reseller Settings> Branding -
Click the Edit icon (top-right).
-
In the Custom URL field, enter your new domain (e.g.
login.mydomain.com). -
Click Update to save.

You’re Done!
Once everything is set:
-
Visit your new domain (e.g.
https://login.mydomain.com) -
Log in using your usual credentials.
Need Help?
If you experience any issues during setup, don’t hesitate to get in touch with us
Related Articles
How To Create A Custom Report
Custom Report Creation Overview The Custom Report feature allows users to generate tailored reports by selecting specific data fields relevant to their operational needs (e.g., trips, telemetry, alerts, assets, or devices). This helps produce focused ...Custom Branded Mobile App
The Custom branded GPS MonitorPlus app is 1 of 3 available mobile app options for monitoring the location of your assets: GPS MonitorPlus - free, generic brand, instantly available, on Google Android or Apple iOS Custom branded GPS MonitorPlus on ...Adding my own custom links
You can add your own custom links to our platform which appear under the user preferences drop down You can add the following links 1) Help & Support 2) Custom Reseller Links 3) Custom Client Links Help & Support link There is a dedicated HELP ...Managing Sub Resellers
When adding a Sub Resellers, there is no DEFAULT CLIENT available. therefore you must follow this order when adding a new Sub Resellers 1. Add the new Sub Resellers 2. Add a CLIENT inside this Sub Resellers 3. Add a Sub Resellers USER, and set the ...Server Ip and ports
Where do I point my trackers? First read the overview of pointing devices to the platform You will need 2 settings to point a tracker to our servers Port - look up the port for my device Server address - data.gpsiot.net Port Each manufacturer has a ...